Introduction
On a Windows operating system, the usual method of running a Java application is via its command line terminal or the Powershell. However, there are some restrictions when running a java application through these terminals. The user with the required rights must be logged on at all times. Also, the terminal must be open and running.
Under many circumstances, this is not desirable. So, often times, some other method of running the application is desirable.
To address these issues, Windows has to capability to run applications as services in the background. Services start up with the system and don't need a user to be logged in. Basically it is similar to a UNIX daemon. Java applications cannot directly be run as a windows service. But thanks to Java service wrappers, it can be easily done. Additionally, additional features like error recovery, log file rollover, restart on failure can also be provided to ensure that the Service runs continuously.
In this blog post, we will take a look on how to run a Java application as a window service.
Different Wrappers
Many different Java service wrappers exist today.
-
NSSM
NSSM which stands for Non-Sucking Service Manager, is a service helper, which according to its website, doesn't suck. NSSM monitors the running service and will restart it if it dies. With NSSM we know that if a service says it's running, it really is.
-
YAJSW
YAJSW is a java centric implementation of the java service wrapper by tanuki (JSW). It is the most feature rich service wrapper available today which offers almost every functionality that other paid service wrappers offer, but for free.
It is open source, which is also one reason for its huge popularity. -
Squirrel
Squirrel is both a set of tools and a library, to completely manage both installation and updating our Desktop Windows application, written in either
C#or any other language (i.e., Squirrel can manage nativeC++applications).Squirrel uses NuGet packages to create installation and update packages, which means that we probably already know most of what we need to create an installer.
Many other service wrappers also exists, like WinSW, Apache commons daemon, Launch4j, but we will only cover the above three in our blog post series. In this blog post, We'll take a look at the NSSM service wrapper.
NSSM Wrapper
The most enticing feature of NSSM wrapper is also the most convenient one as well - GUI. Yes, the NSSM wrapper offers a nice and clean Graphical User Interface (GUI) which makes creating the service process like a walk in the park. So, it allows us to skip through setting all those options before we could create the service.
Using NSSM, the process is very streamlined. Lets take a detailed look.
Pre-requisuite
- Java application, for which service is required
- Windows desktop environment - the service creation process can only be done on a windows machine.
Installation of Service
1. To start, download the NSSM binaries. Both 32-bit and 64-bit are available for download here. At the time of writing this blog, v2.24 is the latest available version. But it is quite possible, by the time we are reading it, newer versions are out already.
2. Next, find the Java path, from where Java can be launched in our system. To quickly find the path on Windows, simply open the command prompt and execute the following command.
for %i in (java.exe) do @echo. %~$PATH:i
We will need this Path in the next steps.
3. Go to the directory where nssm was downloaded and unzip it. After unzipping it, open the command prompt at this location. We will see an executable file by the name nssm here. Run the following command to start the nssm. As a result of this command execution, a GUI will open up.
nssm install <SERVICE_NAME>
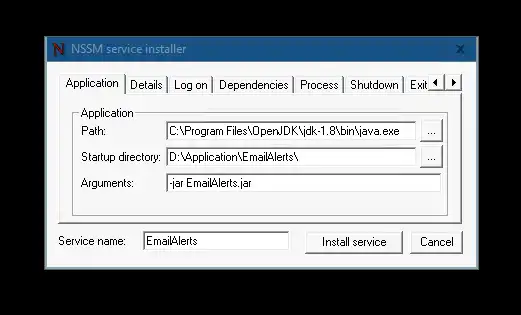
4. Enter the directory PATH copied from Step 2, and paste it in the PATH field. The Startup directory will be where our executable jar file is kept, excluding the filename itself.
5. The third field is to provide any command line arguments which may be required. Let's say it is a Spring-boot application and the application contains multiple profiles. So, to run the application with Test profile, you can enter arguments in the third field.
-Dspring.profiles.active=test -jar <NAME_OF_JAR_FILE>
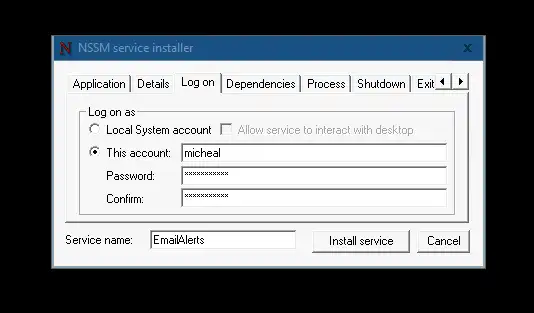
6. Next, go to the LogOn tab and enter the required user credentials which has correct rights. This user credentials will be used to run the service, so make sure that the user has sufficient rights to perform the tasks, which the application intends to do.

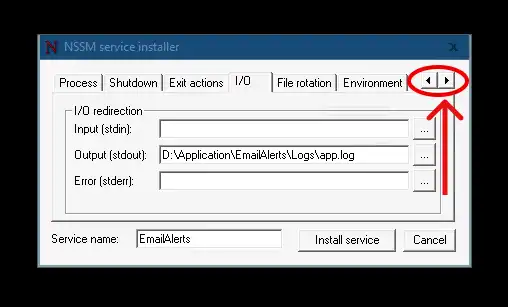
7. Now, Press the right pointing arrow to scroll horizontally and go to the I/O tab at the right side. Enter the directory path where the logs are to be saved. Keep this field empty if No logs are required. In such a case, the logs will not redirected to custom directory path.

8. Press Install Service, and voila, the service shall be installed. All we need to do is simply turn the Service ON. That's it.
Conclusion
So, we saw how easy and simple it was to install a Java application (exported in an executable format), as a Windows service. Feel free to post in the comments beloow if something is unclear or if you've any suggestion. Any feedback is most welcome.

